使用 CloudKit 的一大好处就是可以在不同设备间同步数据,比如我的 iPhone 、 iPad 和 Mac 都可以使用同一份数据,我们看看如何实现
1.订阅数据修改的通知
订阅通知,当其他设备修改了 iCloud 会受到推送通知
iCloud 总共有 3 个类型的订阅
| 类型 | 备注 | 支持的Database |
|---|---|---|
| CKDatabaseSubscription | A subscription for database changes | private、shared |
| CKRecordZoneSubscription | A subscription that causes a push notification to fire whenever any change happens in the specified record zone. | public、private |
| CKQuerySubscription | 订阅具体的 CKRecord 的改变 | public、private |
推送在模拟器上是无法使用的,可以在真机上订阅后,在后台直接修改数据或者通过模拟器修改数据,在真机上观察是否有推送到达
1.1 Save Subscriptions to the Database
以下会将一个订阅添加到 Database,每当 name = "Tommy" 的数据创建、删除、更新的时候,会接收到推送通知
let predicate = NSPredicate(format: "name == %@", "Tommy")
let options = [CKQuerySubscription.Options.firesOnRecordDeletion, 			  CKQuerySubscription.Options.firesOnRecordCreation, CKQuerySubscription.Options.firesOnRecordUpdate]
let subscription = CKQuerySubscription(recordType: recordType, predicate: predicate, subscriptionID: subscriptionID, options: options)

let notificationInfo = CKSubscription.NotificationInfo()
// 开启静默推送
notificationInfo.shouldSendContentAvailable = true
// 普通推送
notificationInfo.alertBody = "Tommy"
notificationInfo.shouldBadge = true

subscription.notificationInfo = notificationInfo

CKContainer.default().publicCloudDatabase.save(subscription) { (subscription, error) in
    // TODO:
}
注意:
If you don’t set any of the
alertBody,soundName, orshouldBadgeproperties, the push notification is sent at a lower priority that doesn’t cause the system to alert the user.
1.2 Register for Push Notifications
iOS 10 之后的普通推送权限获取
import UserNotifications

UNUserNotificationCenter.current().requestAuthorization(options: [.alert, .sound, .badge]) { (accepted, error) in
    // TODO:
}
iOS 10 之后的推送注册
func application(_ application: UIApplication, didFinishLaunchingWithOptions launchOptions: [UIApplication.LaunchOptionsKey: Any]?) -> Bool {
    application.registerForRemoteNotifications()
    return true
}
1.3 Handle Push Notifications in Code
func application(_ application: UIApplication, didReceiveRemoteNotification userInfo: [AnyHashable : Any]) {
    let cloudKitNotification = CKNotification(fromRemoteNotificationDictionary: userInfo)

    if(cloudKitNotification?.subscriptionID == subscriptionID) {
    	if(cloudKitNotification?.notificationType == CKNotification.NotificationType.query) {
            let queryNotification = cloudKitNotification as! CKQueryNotification
            let recordID = queryNotification.recordID

            // TODO
        }
	}
}
但是这里有一点需要注意的,就是推送是可能会丢失的。推送可以根据设备条件进行合并,这个指的是如果一个订阅触发了并且一个推送发到你用户的设备上,但是某些情况下不一定收到推送,这个合并协定的目的就是要至少实现其中一个推送。因此我收到推送时不应该根据推送确定是什么数据改变了,而是应该根据推送确定有数据改变了,并去 iCloud 获取所有的改变。那么我们下面看看如何获取 iCloud 数据改变
2.获取 iCloud Changes
首先我们来看看 iCloud 是怎么确定 changes
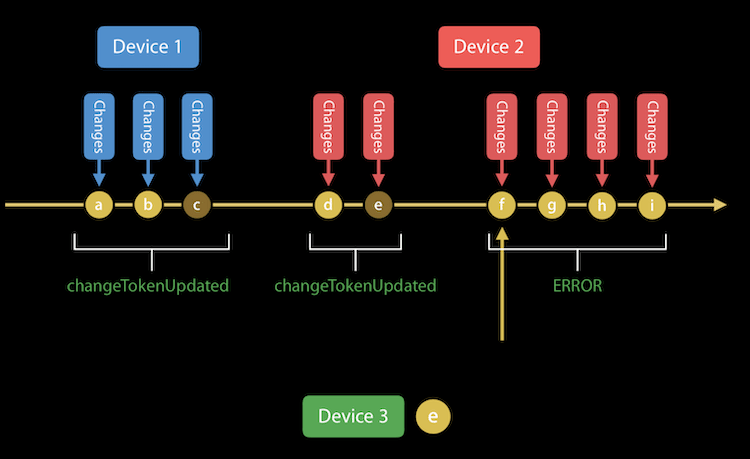
如上图,我们可以看到 iCloud 是通过一个 changeToken 来确定 changes 的。每台设备更新修改数据后,会更新 changeToken。我拿着我设备上的 changeToken 去 iCloud 服务器 fetch changes,就可以获取到该 token 之后的所有改变,当然可以通过一些 API 设置 resultLimit
2.1 Fetch Database Changes
首先我们先获取整个 database 的改变,从中可以获取到改变的 zone
这里注意 publicDatabase 是不能 fetch changes 的,否则会报错 can't retrieve zone changes in public DB
// 这里注意,如果 previousServerChangeToken 为 nil,那么就是获取所有的 changes
let changesOperation = CKFetchDatabaseChangesOperation(previousServerChangeToken: nil)

changesOperation.fetchAllChanges = true

// 保存所有有改变的 zoneID
changesOperation.recordZoneWithIDChangedBlock = { zoneID in
    self.changedZoneIDs.append(zoneID)
}
// 删除本地的数据
changesOperation.recordZoneWithIDWasDeletedBlock = { zoneID in

}
// token 更新
changesOperation.changeTokenUpdatedBlock = { token in

}

changesOperation.fetchDatabaseChangesCompletionBlock = { (newToken: CKServerChangeToken?, more: Bool, error: Error?) in
    // 如果上面 changesOperation.fetchAllChanges = false, 那么 changes 有可能会分段返回
    // 这里的 more 就用来标识后面是否还有 changes

    // 在这个缓存 token 下次使用
    // 用官方的话说就是 saving the change token at the end of the operation

    // 根据 changedZoneIDs 获取 zone 中 record 的改变
	self.fetchZoneChanges(changedZoneIDs)
}
self.privateDB.add(changesOperation)
2.2 Fetch Zone Changes
在 CKFetchRecordZoneChangesOperation 的各种回调中处理数据,比如更新本地缓存 CKRecord,更新本地的 changeToken 等等。这样子就将当前设备的数据与 iCloud 上的同步完成了
这里注意,recordZoneChangeTokensUpdatedBlock 在我使用过程中没有回调,不知道原因。因此对于缓存 token 的操作最好放在 recordZoneFetchCompletionBlock 中,并且我们看它的 Discussion 可以看到 saving the change token at the end of the operation and passing it into the next call 的描述
func fetchZoneChanges(recordZoneIDs: [CKRecordZone.ID]) {
    // 可以通过 optionsByRecordZoneID 设置 token、resultLimit 等
    let changesOperation = CKFetchRecordZoneChangesOperation(recordZoneIDs: recordZoneIDs, optionsByRecordZoneID: nil)

    // record 改变
    changesOperation.recordChangedBlock = { record in

    }
    // record 删除
    changesOperation.recordWithIDWasDeletedBlock = { (recordID, recordType) in

    }
    // 某个 zone 的 changToken 更新
    changesOperation.recordZoneChangeTokensUpdatedBlock = { (zoneID, token, tokenData) in

    }
    // 某个 zone 的 fetchChanges 操作完成
    changesOperation.recordZoneFetchCompletionBlock = { (zoneID, token, tokenData, moreComing, error) in
    	// 在这个缓存 token 下次使用
        // 用官方的话说就是 saving the change token at the end of the operation
    }
    // 所有 zone 的 fetchChanges 操作完成
    changesOperation.fetchRecordZoneChangesCompletionBlock = { error in

    }

    self.privateDB.add(changesOperation)
}
3.数据持久化
我们要将 iCloud 上的数据(包括 CKServerChangeToken,CKRecord,CKRecordZone 等)缓存在本地,这里有一个很方便的方式,使用归档
3.1 对象归档
因为这些对象都使用了 NSSecureCoding 协议,所以我们可以通过以下方法进行归档
public struct CloudArchiver {
    public static func archiver<T: NSSecureCoding>(_ obj: T) -> Data {
        // obtain the metadata from the CKRecord
        let data = NSMutableData()
        let coder = NSKeyedArchiver(forWritingWith: data)
        coder.requiresSecureCoding = true
        obj.encode(with: coder)
        coder.finishEncoding()

        return data as Data
    }

    public static func unarchiver<T: NSSecureCoding>(_ data: Data) -> T? {
        let coder = NSKeyedUnarchiver(forReadingWith: data)
        coder.requiresSecureCoding = true
        let obj = T(coder: coder)
        coder.finishDecoding()

        return obj
    }
}


// 使用
let data = CloudArchiver.archiver(token)
let token: CKServerChangeToken = CloudArchiver.unarchiver(data)
3.2 CKRecord 元数据归档
对于一个 CKRecord 会有一些元数据,如 record name、zone ID、change tag、creation date 等。官方提供了API 对其进行缓存
// obtain the metadata from the CKRecord
let data = NSMutableData()
let coder = NSKeyedArchiver.init(forWritingWith: data)
coder.requiresSecureCoding = true
record.encodeSystemFields(with: coder)
coder.finishEncoding()
// 缓存 data


// set up the CKRecord with its metadata
let coder = NSKeyedUnarchiver(forReadingWith: yourLocalObject.encodedSystemFields!)
coder.requiresSecureCoding = true
let record = CKRecord(coder: coder)
coder.finishDecoding()
// write your custom fields...
参考资料
WWDC 2016 - CloudKit Best Practices
WWDC 2016 - What’s New with CloudKit
WWDC 2017 - Build Better Apps with CloudKit Dashboard
CloudKit Quick Start ~~~